基于Nginx负载均衡方案
项目背景
公司一直使用商用负载均衡(LB),基于以下几点原因考虑用开源产品来替代:
- 价格昂贵,HTTPS支持并发数太低
- 技术门槛比较高,学习成本大
- 技术Bug修复方面都太慢
- 商用产品在新功能技术支持方面(如H2,protocol_proxy支持)滞后
技术选型
主要调研了lvs/haproxy/nginx这三种开源产品在四层负载方面功能特性,新LB方案水平扩展相对容易,选型阶段主要考察功能支持情况,情况如下:
综上,同时负载均衡主要业务对象是web类型,现有运维人员对nginx比较熟悉,最终先把Nginx做四层负载。
方案设计
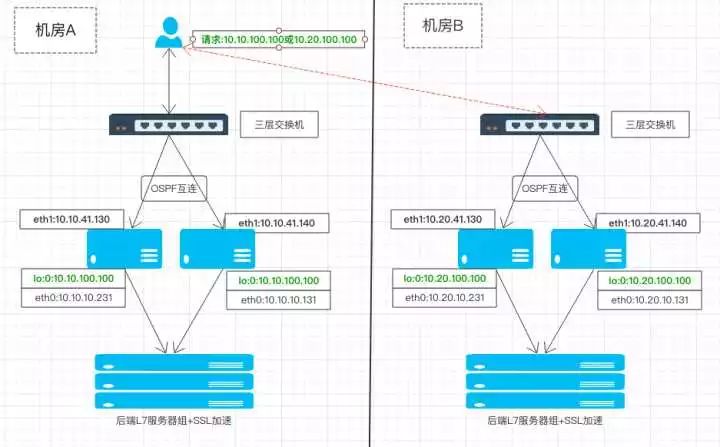
四层负载在最前端,后端七层负载。四层负载主要负责对外暴露公网IP,七层负载主要业务规则重写。同时考虑多机房的容灾,架构设计如下:
上图主要做到以下组件冗余:
- 机房A和机房B即可主备也可双主,避免单点
- 四层接入方面,当OSPF发生故障,可以用Nginx做备用,直接指向L7服务器组
- 双机房L7服务器组也可以同时提供服务,避免单点
- 双机房L7服务器组配置保持同步,安装方式采用静态编译安装,复制考贝启动即可
相关配置
- 网络相关配置[list=square][*]服务器部分配置如下:
[/*]
[/list]
#OS基于Centos7,测试环境,生产环境根据实际情况修改
#安装路由软件
yum install quagga
#配置zebra
#cat /etc/quagga/zebra.conf
!
! Zebra configuration saved from vty
! 2017/09/28 15:57:12
!
hostname test-ssl-10-231.test.org #这个每台名字要不同
password 8 WuN0UOEsh./0U
enable password 8 g9UPXyneQv2n.
log file /var/log/quagga/zebra.log
service password-encryption
#配置ospfd
# cat /etc/quagga/ospfd.conf
hostname test-ssl-10-231.test.org #每台要不同
password 8 cQGHF4e9QbcA
enable password 8 RBUKMtvgMhU3M
log file /var/log/quagga/ospfd.log
service password-encryption
!
!
!
interface eth2
ip ospf authentication message-digest
ip ospf message-digest-key 1 md5 pIW87ypU3d4v3pG7 #此处密码告知网络工程师
ip ospf hello-interval 1
ip ospf dead-interval 4
ip ospf priority 0
router ospf
ospf router-id 10.10.41.130 #每台router-id要不一样
log-adjacency-changes
network 10.10.41.0/24 area 0.0.0.0
network 10.10.100.100/32 area 0.0.0.0 #宣告自己的ospf互边地址和VIP地址,新增地址都在此处添加
area 0.0.0.0 authentication message-digest
!
line vty
!
#启动服务
systemctl enable zebra.service
systemctl enable ospfd.service
systemctl start zebra.service
systemctl start ospfd.service
#添加ospf和zebra保活,打开配置文件打开如下行行
vim /etc/sysconfig/quagga
WATCH_DAEMONS="zebra ospfd"
######策略路由配置,eth0指向默认路由,在eth1模拟公网进行配置######
#cat /etc/iproute2/rt_tables增加
100 wan41
#增加路由表相关配置
ip route add 10.10.41.0/24 dev eth1 src 10.10.41.130 table wan41
ip route add default via 10.10.41.250 table wan41
ip rule add from 10.10.41.130 table wan41
持久化到配置文件
cat route-eth1
10.10.41.0/24 dev eth2 src 10.10.41.130 table wan41
default via 10.10.41.250 table 100
cat rule-eth1
from 10.10.41.130 table wan41
######策略路由配置结束######
- [list=square][*]交换机配置部分(略)
[/*]
[/list]
- 增加zebra ospfd保活[list=square][*]打开/etc/sysconfig/quagga注释以下行:WATCH_DAEMONS="zebra ospfd"
[/*]
[*]
nginx 七层配置,关键是日志配置获取ClientIP如下:[/*]
[/list]
[size=12]server context listen增加如下:
listen 80 proxy_protocol;
listen 443 http2 proxy_protocol;
#log_format ,要配置$proxy_protocol_addr $proxy_protocol_port,
log_format xff '$proxy_protocol_addr:$proxy_protocol_port $http_x_forwarded_for - $remote_user [$time_local] "$request" '
'$status $body_bytes_sent "$http_referer" "$http_user_agent" "$host" '
'$request_time "$upstream_addr" "$upstream_response_time" "$server_protocol"';[/size]
- nginx tcp 四层代理配置
[size=12]stream {
log_format proxy '$remote_addr:$remote_port [$time_local] '
'$protocol $status $bytes_sent $bytes_received '
'$session_time "$upstream_addr" '
'"$upstream_bytes_sent" "$upstream_bytes_received" "$upstream_connect_time"';
upstream backend-test {
server 10.x.x.233:80;
}
upstream backend-test_ssl {
server 10.x.x.233:443;
}
server {
listen 80;
proxy_protocol on;
proxy_pass backend-test;
access_log /opt/test/logs/nginx/m.test.com.log proxy ;
}
server {
listen 443;
proxy_protocol on;
proxy_pass backend-test_ssl;
access_log /opt/test/logs/nginx/m.test.com.log proxy buffer=1k flush=1s;
}
}[/size]
- nginx 加入sysctemctl管理,并加入开机启动
[Unit]
Description=nginx
After=network.target
[Service]
Type=forking
ExecStart=/opt/test/nginx/sbin/nginx
ExecReload=/opt/test/nginx/sbin/nginx -s reload
ExecStop=/opt/test/nginx/sbin/nginx -s stop
PrivateTmp=true
[Install]
WantedBy=multi-user.target
#开机启动
systemctl enable nginx.service
运维管理
- 新增IP
[size=12]cat addip.sh
#!/bin/bash
ip=$1
pswd="test123"
expect -c " set timeout 30
eval spawn -noecho telnet 127.0.0.1 2604
expect \"Password:\"
send \"$pswd\r\"
expect \" *>\"
send \"enable\r\"
expect \"Password:\"
send \"$pswd\r\"
expect \" *#\"
send \"configure t\r\"
expect \" *(config)#\"
send \"router ospf\r\"
expect \" *(config-router)#\"
send \"network $ip/32 area 0.0.0.0\r\"
expect \" *(config-router)#\"
send \"w\r\"
send \"exit\r\"
send \"exit\r\"
send \"exit\r\"
interact" >/dev/null
###增加策略路由
ip addr add 10.10.100.103/32 dev lo:1
ip rule add from 10.10.100.103 table wan41
###持久化到配置文件
#rule-lo:1
from 10.10.100.103 table wan41[/size]
- 保活
[size=12]#故障,OSPF下线,恢复自动上线,监控
set mailserver mail.test.com port 25
set mail-format {
from:devops-notice@test.com
subject:Nginx-L4 $SERVICE $EVENT at $DATE
message:Monit $ACTION $SERVICE at $DATE on $HOST: $DESCRIPTION.
}
set alert admin@test.com
check process nginx with pidfile /opt/test/nginx/logs/nginx.pid
if does not exist for 3 cycles then exec "/bin/systemctl stop zebra" else if succeeded for 3 cycles then exec "/bin/sh /opt/test/sysadmin/o
spf_start.sh"
check host Nginx-L4 with address 10.x.x.250
if failed ping count 5 with timeout 1 seconds then exec "/bin/systemctl stop zebra" else if succeeded then exec "/bin/sh /opt/test/sysadmin/o
spf_start.sh"[/size]
- 性能测试数据
主要测试七层SSL RSA 2048位加解密能力,2620CPU加装了加速卡之后,并发TPS能达到26000。
数据分析
基于ES API获取 带宽,流量,PV数据 汇总后再次存入ES,最终使用grafana进行展示。
本文为 @ 21CTO 创作并授权 21CTO 发布,未经许可,请勿转载。
内容授权事宜请您联系 webmaster@21cto.com或关注 21CTO 公众号。
该文观点仅代表作者本人,21CTO 平台仅提供信息存储空间服务。


